

If you've ever walked into a room where two flooring materials meet-say, plush carpet in the bedroom and smooth hardwood in the hallway-and noticed an uneven, gap-ridden transition that makes your eye twitch, you've seen why aluminum floor carpet trim matters. As a supplier who's worked with contractors, DIY homeowners, and facility managers for years, I can tell you this: properly aligned trim isn't just a cosmetic touch. It's what keeps carpet edges from fraying, prevents tripping hazards, and extends the life of both your carpet and adjacent flooring. I've seen projects cut corners on alignment that went wrong months later-trim popped loose, carpet bunched, and clients had to call for costly repairs. Today, I'm breaking down the step-by-step process to get that alignment right, with lessons I've learned from installing, troubleshooting, and perfecting these products for thousands of customers.

First, let's start with choosing the right trim for your space. You can't align something that's the wrong type for the job, and not all aluminum floor carpet trim is created equal. There are a few key options depending on the transition between your carpet and other flooring. If you're connecting two floor surfaces at different heights-a common scenario between carpet and tile or vinyl-a Z Strip Carpet Transition is ideal. Its unique Z-shape bridges the gap smoothly, no sharp edges or uneven slopes that catch feet. For a cleaner, flush edge at the very end of a carpet run, like along a baseboard or against a hardwood floor, Carpet Aluminum Edge Trim gives a crisp, finished look that's virtually invisible when installed right. If you need a basic transition that fits almost any standard height difference, Aluminum Carpet Transition Strip is a versatile pick that works for both residential and commercial spaces. And for high-traffic areas, Aluminum Carpet Edge Trim offers extra durability because it's designed to resist wear from foot traffic over time. No matter which you choose, making sure the trim is the correct length for your space is your first line of defense against alignment issues. Measure twice, cut once-this old adage is non-negotiable here.
Before you even touch the trim, preparation is the most important step, and it's one many people skip. A misaligned trim almost always starts with an uneven subfloor or dirty, uncut carpet edges. Let's walk through prep step by step. First, clear the area completely: move furniture, pull up any loose carpet, and sweep or vacuum the subfloor thoroughly. Even a small piece of dust or a tiny piece of debris under the trim can throw off the entire alignment, creating a gap that will widen over time. Next, cut your carpet to fit the space, leaving a ¼-inch gap between the carpet edge and where the trim will sit. This gap is critical-it gives the trim room to anchor without pressing too hard on the carpet, which can cause it to bow or shift. If you're working with a concrete subfloor, make sure it's completely dry; moisture under the trim can cause aluminum to react, leading to discoloration or loosening adhesive. Finally, test-fit the dry trim first. Lay it over the transition area without any adhesive or fasteners, and step back to check alignment. See how it lines up with both the carpet edge and the adjacent flooring? If it's slightly off, adjust your carpet cut or trim placement before you commit. I always tell customers this dry fit is like a test drive-you wouldn't buy a car without test driving it, and you shouldn't install trim without a dry fit either.
Now, the core of proper alignment: measuring and marking. This is where precision takes over, and even a ⅛-inch mistake here can throw the whole project off. Start by locating the center of the transition area, especially if you're working in a hallway or a long room with multiple doors. Mark that center point with a pencil, then measure out evenly on both sides to make sure the trim is symmetric. Symmetry isn't just about looking good-it's about ensuring even weight distribution across the trim, which prevents it from pulling to one side over time. For example, if you have a 6-foot transition, mark 3 feet from each end to find the center, then extend that line straight across the floor using a level. Yes, a level is non-negotiable here. If you're working on a sloped floor, the trim has to follow that slope, but it has to be level along its own length. I've seen installers skip the level and end up with a trim that tilts to one side, so water (or coffee, or soda) pools against the base instead of draining away. Pro tip: use a pencil that leaves a thin, light line-too thick a mark and you'll be fighting to cover it during installation, leading to uneven placement.
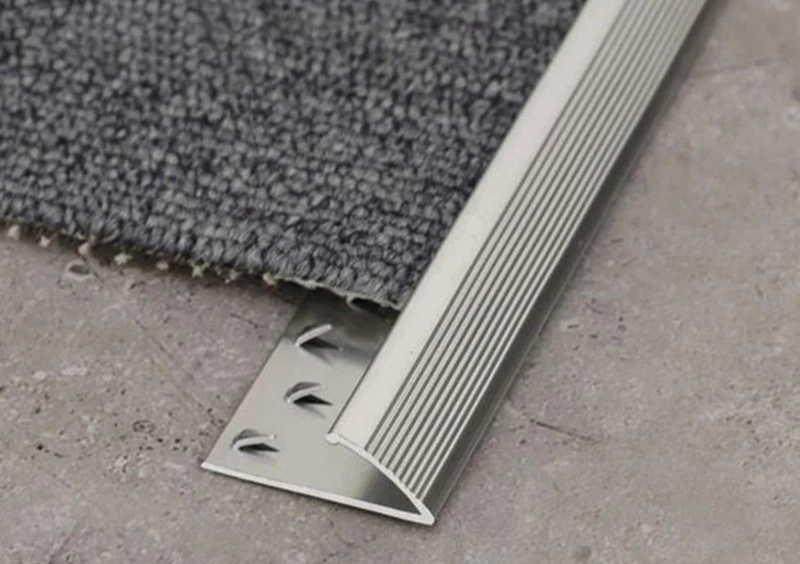
Next, securing the trim. The method here depends on whether you're using adhesive, fasteners, or a combination, and your choice will directly affect how aligned it stays. For most aluminum floor carpet trim, I recommend a two-part system: adhesive for the base, and small fasteners at the ends and center to hold it in place while the adhesive cures. First, apply a thin, even bead of adhesive along the back of the trim's base, making sure to cover the entire length. Too much adhesive will squeeze out and get on the carpet, making it slippery or discolored, while too little will leave gaps where the trim can shift. Press the trim firmly into place along your marked line, then immediately check alignment with your level. If it's even, drive a small finishing nail or a trim screw into the pre-drilled holes on the trim at the center and both ends. Wait a minute-don't hammer all the way in yet. Leave about ⅛ inch of the fastener sticking out, so you can adjust the trim's position if it's slightly off. That's the secret most professional installers don't talk about: you can make tiny tweaks to alignment before the fasteners lock it in. Once the trim is perfectly aligned (check again with your level and by stepping back to eye it from a distance), drive the fasteners all the way in. If you're working in a high-moisture area like a bathroom or laundry room, use corrosion-resistant fasteners-aluminum is durable, but it can react with steel fasteners in wet environments. For Z Strip Carpet Transition, the installation is slightly different: the Z-shape has two flanges, one for the carpet side and one for the adjacent flooring. Slide the carpet edge into the carpet flange first, then press the flooring flange down into place, securing it with adhesive. This type of trim aligns itself as you slide it, but you still need to check that both flanges are sitting flat and level, not tilted.

Finishing the edges is the final step that ties the whole alignment together. Even if the main body of the trim is perfect, uneven end pieces can make the whole project look unprofessional. Cut the trim at the ends using a miter saw for a clean, 45-degree angle, so it meets other trim pieces or baseboards seamlessly. If you're ending the trim against a wall, leave a ⅛-inch gap between the trim end and the wall to allow for expansion and contraction-aluminum expands and contracts with temperature changes, so too tight a fit will cause the trim to buckle or bend. Once the trim is secured, trim the excess carpet edge to fit snugly against the trim's flange. Use a sharp utility knife, and trim slowly so you don't cut too far into the carpet or the trim. Then, use a small piece of adhesive to seal any gaps between the trim and the carpet edge, which prevents dirt and debris from getting under the trim and causing it to shift later.
Now, let's talk about common alignment mistakes I've seen over the years, and how to fix them if you run into them. One of the most common is a trim that's tilted to one side, which usually happens if you skipped the level during installation. If you notice this within the first hour of installing (before the adhesive fully cures), you can gently pry the trim up, scrape off the old adhesive, add a thin layer of new adhesive, and re-align it with your level. If the adhesive has already cured, use a small amount of rubbing alcohol to loosen the fasteners slightly, adjust the trim, and re-secure. Another mistake is a gap between the trim and the carpet edge, which happens if you cut the carpet too short or too long. If the gap is small (less than ¼ inch), use a small piece of carpet tape to fill it, trimming the tape to match the carpet pile. If the gap is larger, you may need to re-cut the carpet. Finally, if the trim is bubbled or bowed in the middle, that's almost always because there was debris under the base during installation. Prying it up, cleaning the subfloor thoroughly, and re-installing with new adhesive will fix that.
Taking care of your trim after installation is just as important as installing it correctly, and it keeps alignment consistent over time. For residential spaces, a quick sweep or vacuum weekly will remove dirt that can build up under the trim and cause it to shift. For commercial spaces with high foot traffic, wipe the trim monthly with a mild detergent to remove grime that can corrode the aluminum and loosen fasteners. Avoid using harsh chemicals that can discolor the aluminum, and never use a steel brush to scrub-this can scratch the surface and create spots where dirt builds up. If you notice a small shift in alignment a few months later, don't wait until it's a big problem. Tighten the fasteners slightly, or adjust the trim gently to get it back in place.
At the end of the day, properly aligned aluminum floor carpet trim isn't just about making your floor look good-it's about functionality, safety, and longevity. Whether you're tackling a small bedroom transition or a large commercial hallway, choosing the right trim, prepping the space carefully, and taking your time with measuring and securing will make all the difference. If you're still unsure about which product is right for your project, or if you have questions about the installation process, our team is here to help. Don't hesitate to reach out to start your project and get high-quality trim that's built to align and last.
References
- The Spruce. (2023). How to Install Carpet Transition Strips. Retrieved from https://www.thespruce.com/install-carpet-transition-strips-1822546
- National Wood Flooring Association. (2022). Transition Strips for Hardwood and Carpet. Retrieved from https://www.nwfa.org/resources/technical-guides/transition-strips/
- Aluminum Association. (2021). Properties and Applications of Aluminum for Flooring Products. Retrieved from https://www.aluminum.org/industries/construction/aluminum-flooring-products
- Professional Remodeler. (2023). Common Trim Installation Mistakes and How to Avoid Them. Retrieved from https://www.professionalremodeler.com/articles/common-trim-installation-mistakes-and-how-to-avoid-them/