

If you're looking to upgrade your interior spaces with a sleek, durable, and low-maintenance finishing touch, stainless steel skirting is a game-changer. As a stainless steel skirting supplier, I've seen first-hand how this material transforms plain plaster walls into polished, long-lasting features. Unlike traditional wood or vinyl skirting, stainless steel resists scratches, moisture damage, and termites, making it ideal for high-traffic areas like kitchens, bathrooms, offices, and commercial spaces. But installing it on plaster walls requires a different approach than standard skirting-plaster's brittle, porous nature demands careful preparation to avoid cracks, gaps, or uneven installation. In this guide, I'll walk you through a step-by-step process to install stainless steel skirting on plaster walls, with tips I've gathered from years of working with contractors and DIYers alike. Let's dive in.
First, let's talk about why stainless steel skirting is worth the effort. If you've ever dealt with warped wood skirting that peels in damp bathrooms or vinyl that scuffs easily in busy hallways, you know the frustration. Stainless steel skirting solves all these issues. It's also highly customizable: you can choose from different finishes, widths, and colors to match your interior design. For example, if you prefer a modern, understated look, our 100mm Brushed Stainless Steel Skirting is a top pick-its matte, fingerprint-resistant finish complements minimalist and industrial styles. If you want a bolder statement, our Black Skirting Boards add depth and contrast, perfect for dark flooring or accent walls. No matter your design needs, stainless steel skirting delivers both function and style.
Before you start installing, you need to gather the right tools and materials, and prep your plaster wall correctly. Skipping proper prep is the most common mistake I see-many DIYers rush into installation, only to find the plaster cracks when they secure the skirting, or gaps form between the skirting and the wall later. Let's break this down.

Tools and materials you'll need:
- Stainless steel skirting boards (measure your walls first! We recommend Skirting Board 100mm for most standard rooms, as it balances visibility and subtlety)
- Stud finder (critical for plaster walls, since they're hung on wooden studs)
- Tape measure, pencil, level, and miter saw (for cutting angles at corners)
- Drill with masonry bit and screwdriver bit
- Wall anchors (or toggle bolts, for plaster walls-regular screws won't hold)
- Caulk (silicone caulk is best for moisture-prone areas)
- Sandpaper (fine-grit, to smooth any rough plaster spots)
- Cleaning solution and cloth (to wipe down the wall)
Now, prep the plaster wall. Start by removing any old baseboards, trim, or loose paint from the bottom of the wall. Use a pry bar carefully to avoid chipping the plaster-if you do chip a small spot, fill it with plaster repair compound and let it dry completely before sanding smooth. Next, clean the wall thoroughly: wipe away dust, dirt, or grease with a mild cleaning solution, because any debris will prevent the skirting from sitting flush. Then, check the wall for unevenness: plaster walls can have small bumps or dips that will cause the skirting to rock. If you find a bump, sand it down; if there's a dip, use a thin layer of joint compound to fill it, then sand again. Finally, mark the floor line where your skirting will sit. Most skirting sits 10-15mm above the floor, so measure up from the baseboards or floor, draw a straight level line along the entire wall. This line will be your guide for installation.
Next, measure and cut your stainless steel skirting. Accuracy here is key-if your cuts are off, you'll have gaps at corners or uneven seams. Start by measuring each wall section, adding 10mm to each measurement to allow for overlap at corners (this creates a clean, seamless look). For internal corners (where two walls meet at a 90-degree angle going inward), you'll need to cut a 45-degree miter on both ends of the skirting pieces. For external corners (where walls meet at a 90-degree angle going outward), cut a 45-degree miter on the ends that will overlap. If you're not comfortable with a miter saw, many contractors prefer to hire a professional for cuts, but modern portable miter saws make this manageable for DIYers. Pro tip: stainless steel is durable but can be scratched easily, so always use a sharp blade and avoid dragging the skirting on the floor. If you want a cut that blends seamlessly, our Stainless Steel Skirting Board comes pre-finished, so cuts will match the rest of the board without discoloration.
Now, here's the part where installing on plaster walls differs from drywall: finding the studs. Plaster walls aren't solid-they're a thin layer of plaster over a wooden lath, which is attached to studs. If you try to drive a screw directly into the plaster, it will crack or pull loose later. So first, use a stud finder to locate the studs along the wall. Mark each stud with a pencil-they're usually spaced 400-600mm apart, depending on your building. For every stud location, you'll need to pre-drill a hole in the plaster: use a masonry bit that's slightly smaller than your wall anchor, drill about 25mm deep. If you're installing the skirting on a non-stud area (like between two studs), toggle bolts are your best bet-they expand behind the plaster, creating a strong hold without cracking the wall. Pre-drill a hole for the toggle bolt, insert the toggle bolt through the skirting, then push it into the wall and tighten the screw until it's snug (don't over-tighten, or you'll crack the plaster).
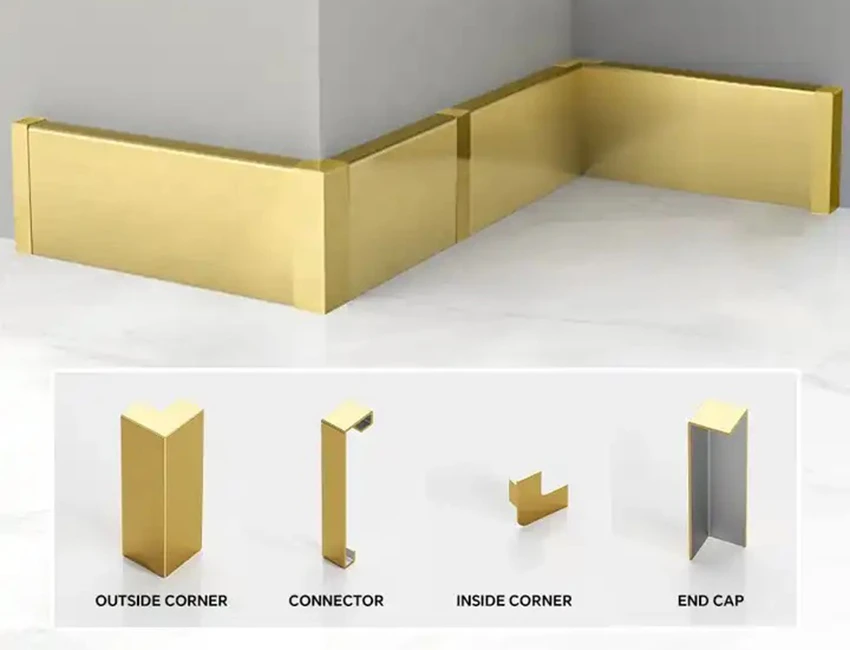
Once your holes are pre-drilled, it's time to secure the skirting to the wall. Start with a corner piece: apply a small bead of silicone caulk along the back of the skirting (this creates a waterproof seal, great for bathrooms or kitchens) and align it with your level line. Make sure the miter cut is tight at the corner-there shouldn't be a gap. Then, use screws and wall anchors to secure the skirting to the studs or toggle bolts. Space screws every 400-500mm along the skirting, which is standard for stability. After securing the first piece, check it with a level to make sure it's straight-adjust if needed before moving on to the next piece. For long walls, it's easy for the skirting to bow slightly, so periodically check the level to keep it even. If you're working with the brushed finish, like our 100mm Brushed Stainless Steel Skirting, be extra careful when handling it-brushed finishes show scratches easily, so avoid using metal fasteners that can leave marks. We recommend using countersunk screws that sit flush with the skirting, so you don't catch on the finish or have uneven spots.
Once all the skirting is secured, you'll need to finish the edges and fill any small gaps. There might be tiny gaps between the skirting and the floor, or at corners where the miter cut isn't perfect. Don't panic-this is normal. Use paintable silicone caulk that matches your skirting color. If you're using black skirting, use black silicone caulk; if you're using brushed stainless steel, a clear silicone that dries to match is ideal. Apply the caulk along the gaps, then smooth it with a wet finger for a clean, even look. Wipe away any excess caulk immediately, before it dries, because stainless steel can be tricky to clean once the caulk is dry. For the screw heads, if they're countersunk, you can leave them as is-stainless steel screws match the finish of our skirting, so they'll blend in. If you used regular screws, you can use stainless steel screw covers to hide them, which gives a more polished look.
Now, let's talk about maintenance, because one of the biggest benefits of stainless steel skirting is how easy it is to care for. Unlike wood, which needs staining or sealing every few years, stainless steel just needs a quick wipe down with a soft cloth and mild soap to remove dust, fingerprints, or spills. Avoid harsh chemicals like bleach or abrasive scrubbers, as they can scratch the finish or dull the metal. For our Black Skirting Boards, we recommend using a microfiber cloth to keep the finish looking new, as paper towels can leave tiny scratches. And if you do scratch the skirting, most minor scratches can be buffed out with a stainless steel polish-just follow the manufacturer's instructions to keep your skirting looking fresh.
Wait, let's address a common question I get: can you install stainless steel skirting over existing plaster walls, or do you need to remove old skirting? In most cases, it's easier to remove old skirting first, because it ensures your new stainless steel skirting sits flush and straight. If you leave old baseboards, you might have uneven surfaces that create gaps, or the old baseboards could pull away from the wall and take your new skirting with them. That said, if the old baseboards are level and securely attached, you can install stainless steel skirting over them, but you'll need to adjust your line accordingly. Always measure twice to avoid mistakes.
Another tip: for high-moisture areas like bathrooms, make sure you use waterproof silicone caulk around the bottom of the skirting, especially near the shower or sink. This prevents water from seeping behind the skirting and damaging the plaster wall over time. Plaster is porous, so standing water can cause it to soften or mold, which is a problem for both your wall and your skirting. Using the right caulk is a small step that adds a lot of longevity.
Now, let's talk about sizing. As a supplier, I often get asked what size skirting is best. For standard rooms, Skirting Board 100mm is the most popular-it's not too tall, so it doesn't overwhelm the room, but it's visible enough to cover any unevenness at the bottom of the wall. If you have higher ceilings (over 2.7m), you might go with a 120mm or 150mm skirting for balance, while smaller rooms (like hall closets) work well with an 80mm skirting. The Stainless Steel Skirting Board comes in multiple widths, so you can choose the right one for your space.
If you're still unsure about the installation process, working with a professional is always a good option. Plaster wall installation requires attention to detail, and a contractor who specializes in stainless steel finishes will have the experience to avoid common mistakes like cracking the plaster or leaving uneven gaps. But with the right tools and patience, DIYers can tackle this project too-just take your time, double-check your measurements, and follow the steps we've outlined.
At the end of the day, installing stainless steel skirting on plaster walls is a small project that makes a huge impact. It adds value to your space, lasts for decades, and requires minimal maintenance. If you're ready to upgrade your walls, we offer a wide range of options, from the classic 100mm Brushed Stainless Steel Skirting to the sleek Black Skirting Boards to fit any design style. Whether you're a contractor working on a commercial build or a homeowner updating your kitchen, we have the quality products and expertise to help you get the job done right. To learn more about our products or discuss your project needs, please reach out to our team to coordinate a consultation and ensure you choose the perfect stainless steel skirting for your plaster walls.
References
- Industry Guide to Plaster Wall Finishing, Interior Design Association, 2023
- Stainless Steel Skirting Installation Best Practices, Building Materials Magazine, 2022
- Maintenance Tips for Metal Interior Trim, Home Improvement Trade Journal, 2024
- Selecting Skirting Widths for Residential Spaces, Architectural Digest Design Guide, 2023
- Waterproofing Techniques for Bathroom Interior Finishes, Construction Safety and Standards Board, 2023